|
How A Compact Disc Is Manufactured
by Michael Wesolowski
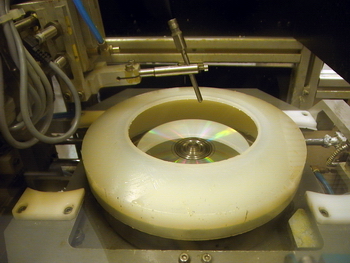
One of the machines used to imprint the information onto the CD.

|
|
Remember Albany Indestructible Cylinders?
(They destructed) Remember Decca
Unbreakable Records? (They broke)
Remember the early advertising for compact discs
as "Perfect Sound Forever"? As always, don’t
believe the marketing hype. The compact disc is
indeed a technological wonder, but it is still not the
pinnacle of recorded sound media.
In order to be an educated consumer, one must
understand the manufacturing process of a compact
disc. A CD is a digital delivery system. Anything
that can be digitized can be placed on a CD or CD-
ROM. In the case of an Audio CD,the original
music must be converted to binary code first.
(Computer 1’s & 0s) For every second, the music
is sliced into 44,100 samples per channel.
These samples are 16 bits long. ("1001111000101001"
would be one sample, from one channel) This
binary number, when decoded, represents a certain
positive or negative voltage. String the voltage
changes together, and an analog waveform starts to
appear.
Please keep in mind this is a very basic view of
how CDs work. For the sake of simplicity,
I will not be taking into account the specific ways the
data is encoded. For those wanting the full story,I
highly recommend "Principles of Digital Audio
— 4th edition" by Ken C. Pohlmann (McGraw-Hill
Video/Audio Professional).
Ultra violet lacquer being spin-coated onto the CD.
|
|
It is this 44.1k, 16-bit sample that many
professional audio engineers feel is inadequate.
In a studio setting, when having the original analog
recording for direct comparison, the current digital
standard falls just short of capturing the full analog
sound. The sound stage collapses a bit with digital.
This is why many companies are introducing
"Super CDs" having 24 bit word lengths and a 96k
sampling rate. (Better Perfect Sound Forever)
Once the music has been encoded into binary digits
and stored either on digital tape, hard drive or
CDR, a glass master is made. A glass master is a
round thick piece of optically pure glass. It is spin-
coated with an even layer of dye that is reactive to
laser light. The glass is put inside an enclosed
turntable and a LBR (Laser Beam Recorder) head is
aimed at the glass. While the glass is rotated, the
LBR pulses on and off, burning tiny pits in the dye
using the binary code from the master. The tiny pits
are formed in a spiral from the inside
of the glass to the outside.
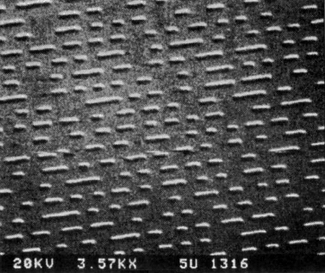
These pits are small, very small. On average, a CD
will contain 15 billion pits. The pits are 1/2 micron
wide (one micron = one-millionth of a meter), 0.1
micron deep, and vary from 0.8 to 3.0 microns in
length. The spiral tracks are spaced 1.6 microns
apart. For perspective, a human hair is 75 microns
in diameter; a fingerprint is 15 microns thick, and
an average piece of dust is 40 microns thick.
A close up view of the pits on a CD.
|
|
The next step is to grow a metal layer onto the
glass. Sputtering and electroplating are used to
cover the dye with metal, with the metal flowing
right to the glass where the dye has been removed
by the laser. After the metal has been built up to the
desired thickness, the metal layer is pulled away
from the glass and dye. The outer and inner
dimensions of the metal are cut, and the backside is
polished. This is called a Father, and can be used as
a stamper to press CDs. The Father can also have
metal grown on it, and a Mother created. The
process is repeated, and Sons are created. The Sons
can be used as well to press CDs. (The Mothers can
NOT be used for pressing since the pit structure
would be in reverse). The glass master is simply
washed off, polished, coated with dye and used
again for a new project.
With the digital data now encoded in the pits of the
stamper, the stamper is placed into an injection
mold cavity. The cavity, when closed, is the exact
dimensions of a CD. A small hole in the middle of
the cavity is where plastic is injected into the mold
at high pressure. The plastic conforms to the shape
of the mold, one side being smooth, while the other
will have small pits pressed into it from the
stamper. The plastic is allowed to harden, (3
seconds) and the now clear CD rolls down a
pathway to make room for another CD to be
pressed.
At this point, the data is on the CD. It is
permanently stamped into the plastic. The only
reason it cannot be played is the simple lack of a
reflective layer. Inside your CD player, a laser will
shine through the underside of the disc, and bounce
back into the lens as it hits the reflective layer.
(Aluminum in most cases, but can also be 24K
gold). The depth of the pits is bigger than the
wavelength of the laser. This allows the returning
laser beam to be read by the CD player which can
readily identify the edges of the pits and lands to
interpret them as 1’s and 0’s.
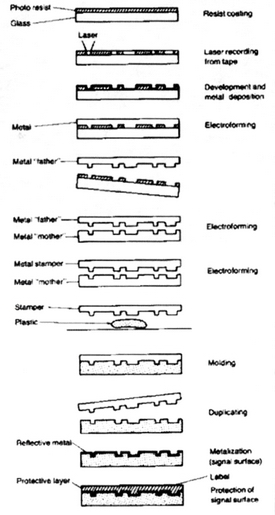
The steps in manufacturing from the master to the
final product.
|
|
Obviously the next step would then be to apply a
thin layer of metal to the pit side of the disc. This is
done via a sputtering process. The clear disc is
placed in a vacuum chamber, with an electrical
charge being applied to one end of the
cathode/anode system. Aluminum particles from a
solid circular brick of aluminum try to find their
way to the other side or the charged field. However,
with the clear disc in the middle of the chamber, the
aluminum particles strike the disc instead, coating it
with a very thin reflective layer. As the CD leaves the chamber,
it is now ready to play is any one the CD players around the world.
Now that the discs can be played, we need to make
sure they last "forever". Metal will oxidize when
exposed to air. The metal coating is so thin; it will
disintegrate in a matter of months if left
unprotected. To stop the oxidation, and to protect
the pits, a thin layer of UV (Ultra Violet) cured
lacquer is spin-coated onto the metal surface. The
CD is spun slowly at first while a small amount of
the lacquer is placed near the center. The disc is
then rotated faster, using centrifugal force to evenly
cover the disc with lacquer. The excess coating is
collected as it spins off the disc and recycled. The
CD is then placed under a high intensity UV light
and the lacquer is cured in roughly 1.5 seconds. As
the CD leaves the press,it is optically scanned for
any imperfections.
How long does it take for all this? In the early days
of CDs, presses could turn out a CD every 10
seconds, today, that time has been cut to just over 3
seconds. If one single plant has 25 presses working
24 hours a day, based on a 3.5 second cycle time,
the plant could theoretically press 225 million discs
a year. Add the total number of plants around the
world, (hundreds at last count), and billions upon
billions of CDs are produced annually.
If treated carefully, a CD in this state should last
well beyond any of our lifetimes. Why only
should? For starters, there are some chemical
reactions that can occur with the lacquer used in the
1980’s. Many titles pressed during this time, when
placed next to a certain type of padding will self-
destruct. I am specifically referring to double CD
sets that would be packaged in the "Double-Fat
Jewel Boxes". A piece of padding was usually
placed on top of the CDs for protection. If left
touching each other for any long length of time, the
chemical interaction between the two would leave
the CD unplayable. The lacquer would break down
and let air oxidize the metal. The chemical structure
of the lacquer has since been changed. If you have
any of these double CD sets in your collection,
remove the padding immediately and hope for the
best.
Some of the items on display at the CAPS meeting.

|
|
The ways discs are treated often determine the
lifespan of the disc. Most of the general public
think the bottom of the disc is most susceptible to
damage. This is clearly not the case. The bottom of
the disc is easy to repair. If it gets dirty,it can be
cleaned with most any soft soap/dishwashing
detergent solution. If it gets scratched, it can
usually be buffed out. It takes heavy damage to the
underside of the disc to render it unplayable. A
scratch on the top of a CD,if deep enough, will cut
through the lacquer and destroy the metal and
connecting pit structure. This type of damage can
never be fixed. With this in mind, never stack your
CDs or keep them stored loosely on your desk. If
they are not in your player, they should be in a
protective jewel case. No exceptions.
Error correction comes into play if the CD player
can’t read a defect on the disc. Unlike analog
records, which are linear, CDs use a non-linear
data encoding process. The digital information is
repeated, and scattered slightly in the code. If one
block of information is unreadable, the next block
to be read can be used to recover the lost data.
Here is a written analogy:
Analog
The Canadian Antique Phonograph Society holds
meetings at Centennial College, Progress Court,
Scarborough, Ontario. Meetings begin at
1pm. There is a 15-minute break between the
presentation and the member auction. Snacks are
served.
Mike holds the aluminum disc used to coat the
stamped CDs and a spindle which holds clear
CDs ready to coat.

|
|
Digital
The Canadian Antique Phonograph Society holds
meetings at Centennial College, College, The
Canadian Antique Phonograph Society holds
meetings at Centennial Centennial College, The
Canadian Antique Phonograph Society holds
meetings at
Place your finger across both paragraphs. Even
though your eyes cannot see every word, your brain
can put together the missing data in the digital
version. Your CD player uses a similar technique.
The last step in the manufacturing process is to
print the artwork on the face of the CD. Silk
screening is the most common type of printing
method. It can be a simple one-color text only print,
or it can be a 5-color photographic quality print.
Any color can be used. If an esoteric color is
needed,it is custom mixed on the spot using a
unique ink recipe (much like getting a special color
paint mix at your local paint store). Once again, a
UV system is used. The ink is applied one color at a
time, passing through a high intensity UV light to
dry the ink before the next color is applied. One
advantage to a full coverage print job is that it adds
another layer of protection to the CD. The UV ink
is extremely hard once cured, and if the ink can’t
be scratched, neither can the surface beneath.
After printing, the CDs are assembled according to
the wishes of the client. In most cases the standard
jewel box is used. The entire process is automated.
Spindles of CDs are in one staging area, artwork in
another, jewel cases and trays in a third. On the
output side of the machine, the CDs are boxed and
prepped for shipping.
What will we be manufacturing ten, twenty, fifty
years from now? Only time will tell. Some predict
laser read holograms able to hold terabytes of
information will take over; others predict small
chips will hold the keys to the future. Whatever the
new delivery system might be, expect to hear from
the marketing departments. I’m sure the sign in the
window will read, "New Improved Double Plus
Good Perfect Sound Forever And Then Some.
|

