|
Restoration of My Wurlitzer 500 Jukebox
by Mike Dicecco
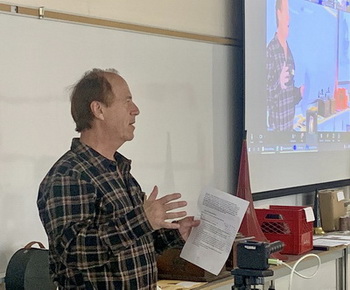
Mike Dicecco presenting his restoration project
at the
CAPS Show & Tell meeting, May 5, 2024
|
|
For my part of the presentation I chose to talk about the restoration of this vintage jukebox as it’s such an unusual
piece; it took so long to fully restore and in the end it turned out so good (well beyond my initial expectations). I
had never performed a total restoration of this magnitude before, so it was both a labour of love and very much a
learning process. In hindsight, I really had no idea what I was getting myself into but it’s fun from this perspective
to look back at the end results, and be proud!
Let’s start by talking about what exactly is a "Wurlitzer 500"?
The late 1920’s and early 1930’s was a time of great electronic advancement in the playback of not only records,
but also "talkie" movies. Several manufacturers such as Capehart, RCA Victor, Seeburg, Rockola and AMI
(American Music Industries) began to design "commercial phonographs" (which later were called "jukeboxes" by
the public). One of the latecomers to this field was the Rudolph Wurlitzer Company, which in 1933 purchased the
Simplex changer mechanism and used it for years in all their products.
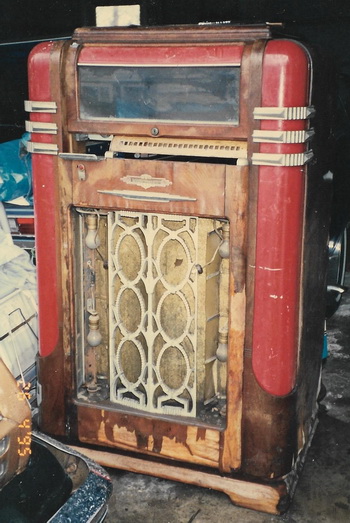
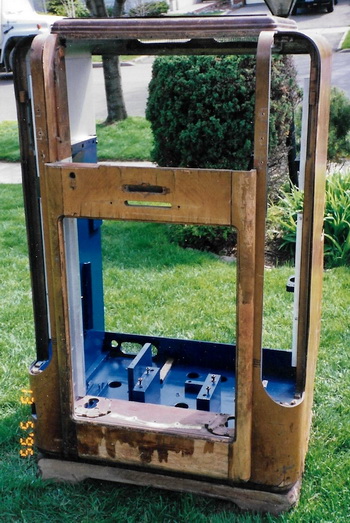
My Wurlitzer 500 as received (1995)
|
|
The early jukeboxes were essentially fashioned after the large home console radios/phonographs of the day, with sometimes a
viewing window at the top for the patrons to view the mechanism. Wurlitzer quickly led the field and discovered
that a jukebox would have more ‘play appeal’ if it was brightly illuminated, as well as have a record changer that the customers could watch (therefore being more
profitable). They gradually started adding coloured
plastics, mirrors and later, bubble tubes, to make
their product stand out from the competition, and it
worked! Wurlitzer jukeboxes from this period command the highest prices today and are amazing show
pieces. Art Deco works of art. They are also a great
way to play some of your favourite 78 RPM records at
home.
For 1938 Wurlitzer offered three models: a 12-play
table-top machine, a smaller basic full-size model
600 (with no animation) and the largest top-of-the-line model being the 500. This played one side of 24
records, 10" 78 RPM. It’s a big beast, measuring 58"
high and 35" wide, with a weight of 410 lbs (without
records).
The Wurlitzer 500 model was the first jukebox to utilize animation. That is, in the front on either side of the
grille, were two rotating cages of translucent plastic
sheets that rotated around several light bulbs (driven
by tiny motors) and projected onto the front grille (or side pillars). The constant changing of colours created an incredible overall effect that must have been quite a novelty for those who first saw it in their favourite restaurant or
bar. Following this model, most full-size jukeboxes had some form of animation up until the early 1950’s, but this
was the first time this feature had been used.
Another unusual (for the time) aspect was separate bass and treble
controls on the amplifier, as a way to customize the sound coming
through the 15" field coil speaker.
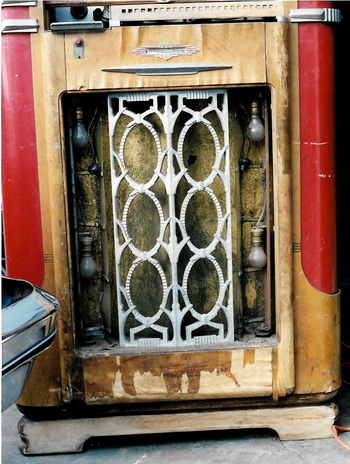
Close up of the lower front.
Note the excessively damaged veneer and
the missing bottom trim which had to be
created by my friend Marty. The colour cylinders sheets were missing from beside the
grille, as they had rotted out. Replacement
sheets are available.
|
|
To complicate matters (from a restoration perspective) the model
500 was available in four different configurations: one with the animation unit in the pilasters (side pillars), one with the animation unit
shining on the grille (my unit). Therefore, some had red (or white)
pilasters and some had red (or white) grille plastics. There were also
two different coin units: one with mechanical coin counters (more
common) and another with an electric coin slot system that was
able to reject "slugs" (my unit) more accurately. This is important,
because even though a dealer may have some used parts for a
Wurlitzer 500, there’s a 50% chance that they will not be the right
ones!
To add to the scarcity of this machine, during World War II manufacturers were not allowed to make much civilian equipment (due to
metal shortages), and jukeboxes were deemed non-essential
(except perhaps for entertaining the troops). Wurlitzer came up with
a "Victory" model that would appear to put a new jukebox in front of
the public (and combat men), but it was actually just a way of encasing an older jukebox mechanism in a new cabinet. As such, many of
the pre-War machines had their cabinets scrapped and their innards
re-purposed in a Victory jukebox. The earlier and desirable machines
such as W600, W500, and W24 models were destroyed, reducing
the surviving numbers (and original parts).
I mention all of the above, because these factors conspired to make
it much more difficult to find original parts when I was searching them out for my restoration. It all
goes back to doing a full and proper
research before buying and beginning a vintage project.
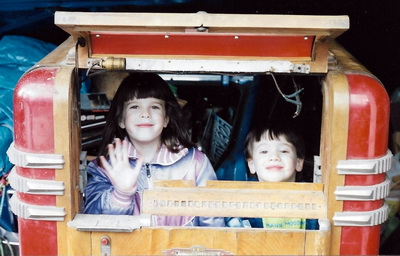
My kids Veronica (age 6) and Raymond (age 4) decided to help out by
climbing inside the cabinet. They are now in their 30’s and want nothing to
do with jukeboxes! Is this Wurlitzer the cause?
|
|
Acquiring an Unrestored Wurlitzer 500, or "What Did I Get Myself Into"?
I had a couple of friends who were
travelling with a van to the Chicago
Coin-Op show in April 1995. They
would usually restore jukeboxes and
radios, sell them at the show, and
then bring more items back to continue the restoration cycle (and
make some good money in the process). I told them to keep an eye out
for an old Wurlitzer 78 RPM jukebox
if one came up for a good price (at
this point in my life I already had two
other jukeboxes, one that played 78’s
and the other 45’s. Another 78
Wurlitzer would be great for my large record collection). Several days passed by. I didn’t think anything would come
up, which was good, because I had not told my wife Liz about it, and wasn’t sure how she would appreciate another
big item coming into our house.
Minutes before leaving work on a Friday afternoon, I received a call from
one of my friends. He was so excited: "Mike, Mike; we found you a great
jukebox! It’s only $400 USD". Most of it’s there, just needs a few parts
and cabinet work. It’s a steal!" I called Liz immediately, told her what a
great find my friends had made, AND they would be kind enough to
bring it back in their truck from Chicago, to my home in Toronto. How
could I lose?
I’ve stripped everything out of the cabinet and have it on my front lawn. I’ve
saved time and money by doing this
part of the work myself, as well as
re-painting the inside of the cabinet.
It’s ready to go to Marty’s house
in Hamilton.
|
|
Liz could sense my excitement and quickly agreed. A few weeks later, on
a rainy spring afternoon my friends arrived with their open back truck
and my Wurlitzer, partially covered by a tarp in the back. I was in for a
shock: my friend had taken the mechanism out (so that he could restore
it for me), but there was so much else missing or damaged: tone arm,
tubes in the amplifier, title board, all the coin mechanism, both back
doors, and many small pieces removed along the way by others raiding
it for parts. The worst part was clearly the cabinet. Besides probably being in the rain all the way back from Chicago, there were large sections
of veneer missing, as well as major parts of the bottom front trim. The
veneer that was still on the cabinet was lifted and distorted (and therefore unusable).
Once my friends left, I stuck my head in the back of this old relic and
thought "What have I gotten myself into? It’s such a wreck!" It was dirty
and dusty; neglected and picked over for parts. Could it ever be restored
to some degree, and actually work? My glimmer of hope came that night,
when I decided to plug in a couple of light bulbs that were still in the cabinet. The glowing red image somehow gave me hope that I’d be able to do
something, somehow to get this former beauty working again. Most of the "Before" pictures accompanying this article were taken on the day of arrival. I wanted to capture the true condition before I went to work on it, which turned out to be the next three years.
On The Long Road to Restoration
My first step was to wash down as best I could the interior of the
cabinet. In old jukeboxes there is usually much more than dirt to
clean out. There is the dreaded nicotine from years of patrons
smoking around the jukebox. Apparently, it’s still cancerous, so if
you do ever get an unrestored juke, be sure to wear heavy rubber
gloves when you are removing the dirt and grime. Wearing a mask
too is probably a good idea.
My friend Marty has re-veneered the cabinet
and created the missing front lower trim. It’s
now ready to be sanded, stained and lacquered. It also had to be re-glued and
clamped to restore the original structure
which deteriorated due to moisture and
neglect.
|
|
Take lots of pictures of how everything goes together, before you
start removing parts. For instance, I removed all the light bulb
sockets and cloth covered original wiring (each light piece would
later be re-soldered with the proper wiring, but it’s hard to remember exactly how it all went together). At the time I did this machine,
we only had printed film photographs, it’s so much easier
today with digital pictures.
There are manuals for this model, and others from the late
1930’s, but they are more for listing parts and making adjustments. The manuals do not often go into detail as to how all the
parts go together. You
may be lucky enough
to find someone online
who has a similar machine and will send
you pictures, but the
easiest way is to just
document it fully yourself before you begin to disassemble. I also found it helpful to put the
various small screws and pieces in clear bags and carefully label each
one.
My goal was to strip the cabinet down to the bare essentials, repaint
the inside with the correct colours, and then have the outside veneer
done by someone with the proper skills (as I knew it was beyond by
ability). To restore something as big and complicated as a vintage jukebox, it’s very similar to doing an old car. You divide it up into various
sub structures (that require special skills) and address each area separately: wood cabinet restoration, rebuilding the amplifier, volume control and speaker, re-plating the metal, cleaning and rebuilding the
mechanism, electric motor rebuilding and other cosmetics. Fortunately,
I knew a few people who were able to help me with the work that I
could not do myself.
I should point out that restoring jukeboxes is different from other antiques in that it is perfectly acceptable to refinish, re-paint, re-plate, and
replace some of the original parts if needed. The goal is to make it look
as close as possible to when it first came out of the factory. The same
logic is used in restoring an antique car or truck. Fortunately, many reproduction parts are available to help. It would of course be preferable to
obtain a jukebox in mint condition, but those are few and far between.
Most have served a very hard life and then ended up neglected in damp storage for years.
Here’s a picture of a red pilaster plastic
after spraying Fantastic cleaner on it.
Note the bubbles have turned brown
and the sink has a gross tar-like residue. That’s the remnants of cigarette
smoke which is common on old jukeboxes (as well as potentially cancer
causing!). Gloves and mask are
mandatory.

|
|
Clearly my biggest challenge would be to have the cabinet properly
restored. Fortunately, through my initial friends (who found this juke
for me) I met a very skilled craftsman named Marty MacKenzie of
Hamilton. Some of you may know him, as he was a CAPS member
for several years. Marty worked on my Wurlitzer cabinet over the
summer months of 1995. He disassembled the entire unit, then reglued it back together to ensure proper strength and fit.
Marty was able to recreate the missing base trim in the front (which
would have been impossible to find), and also used a veneer that
was as good as, or more ornate than the original (see photos). Several layers of hand rubbed lacquer created the glamorous shine.
The photos document the restoration as it progressed. One of the
best parts of restoring this machine has been the friendship that I
have to this day with my friend Marty.
The electronics (tube amplifier and volume control) were sent out to
an old-timer radio repair man who knew exactly what to do with
them. The parts manuals fortunately had the schematics for the amplifier, which made it much easier to rebuild. In case you’re not familiar with restoring vintage electronics, the capacitors are always
replaced, and resistors are
checked to ensure
that they are within
specifications. Surprisingly it’s still
relatively easy to obtain these parts, as well as electronic tubes
(there are many dealers who sell them).
I was fortunate in that all of the original plastics were present. The
condition was a little rough, but with water-sandpaper and a lot of
buffing they shined up like new. The plastics in pre-war Wurlitzers
were about ¼" thick, and are often salvageable. Post war they
started using much thinner plastics that shrank with the heat of
the light bulbs, so they usually have to be replaced with reproductions (that are hopefully available). Points like this I learned as I
went along. However, it would have been better if I had researched this more before purchasing, as I could have run into
serious issues had my machine been missing any plastics.
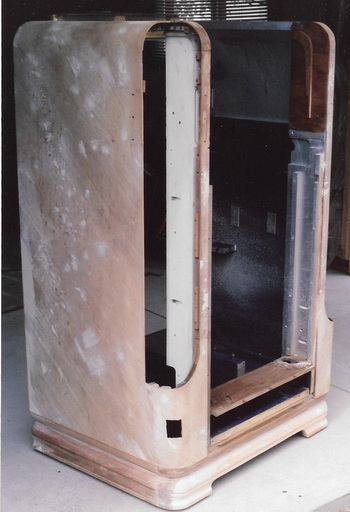
The cabinet is back at my house, beautifully
re-finished. The mechanism has been
re-installed too. It’s getting there!

|
|
A word of caution: since jukeboxes were usually in public places
where people congregated, they were subject to years of tobacco
smoke. Every part of them is coated with nicotine that could be
potentially cancer causing. See my picture of what came off one
of the red plastic pieces. Gross! Be sure to wear gloves and a
mask when cleaning something like this.
The original tone arm was missing, as was the heavy magnetic
cartridge (that used a Perm-O-Point needle). Once I found a replacement tonearm, I elected to upgrade to a modern ceramic cartridge that gave improved sound, and most importantly tracked at a
much lighter weight (15 grams vs the original 120+ grams). Most people will make this upgrade on vintage jukeboxes to
help save their precious vintage 78’s. Visually the
change is hardly noticeable.
Electroplating this machine was more expensive due to
the large ornate grille, as well as numerous intricate
parts. The original plating was nickel, which was now a
dull gray and looked terrible. I chose to go with chrome
to give a brighter sheen
that lasts (and never
needs polishing). Fortunately, at the time I
worked in downtown Toronto, and there was a
"hole in the wall" plating
company that did excellent work at very reasonable prices. I believe they
were shut down by environmental watch dogs in
the late 1990’s, long after all my plating needs
were met.
Light bulbs were another
challenge that would later
arise. Even though the
majority of the bulbs used
were standard incandescent 15 watt bulbs, four
areas used unusual Lumiline Bulbs. These are
elongated tubes (similar
to fluorescent) that use
an incandescent filament.
Fortunately, I was able to
get some at the time of
my restoration for about
$20 USD. (Currently there
is an LED replacement on
Amazon for "only" $130
per bulb!). This would add
a very large expense if
the restoration was done
today.
The elusive coin equipment that took me 17
years to locate and cost more than the original amount of the entire jukebox. This was
extremely difficult to find.

|
|
One part that took me
much longer than anticipated was re-wiring the entire cabinet, not only the lights,
but all of the components and a junction box. The original wiring had become old and brittle, truly a fire hazard. The problem is that Wurlitzer didn’t use ordinary
lamp cord in their product. Instead they used a gold
cloth covered type wire (similar to that used on appliances of the time such as irons). This, too, increased
the restoration costs and involved more trimming and
soldering time (literally hundreds). To do a proper job
I’d have to go with the original type of wiring. Fortunately, one of the suppliers was able to provide all I needed
(and it looks great).
As I reflect back on the restoration process, I recall that
one of the biggest obstacles was finding parts, as this
was before the internet was widely available. There
were two main suppliers at the time, both in Iowa: Victory Glass Jukebox (still going strong) and Jukebox
Junction (now defunct).
Between the two I was
able to obtain most of the
missing parts, and/or the
raw materials to fabricate
my own. Sometimes if
they did not have a part,
they were able to refer
me to other used parts
suppliers who might have
what I needed.
While I’m on the subject
of finding parts, I wanted
to mention the problem I
had in locating the missing coin mechanism for
this jukebox. I was told
after purchasing, that it
was common practise
when jukebox operators
retired their machines
from routes, to remove
the coin equipment so
that competitors could
not buy the used jukes
and muscle in on their
territories. As such, the
majority are missing
these important pieces
and when the parts become available, they command a very high price. It
took me 17 years to locate what I needed (off
eBay), and I paid more for
them than I did for the
entire jukebox! But for me
it was well worth it, as it
finally completed the entire machine. Again, this is
something I should have researched in detail before
purchasing, so that I would know what I’d be up
against for a proper restoration, as well as the final
costs.
Tips For Restoration
Needless to say, restoring this jukebox was definitely a
learning process over a lengthy period of time. I’d like to offer the following advice about restoring anything
similar:
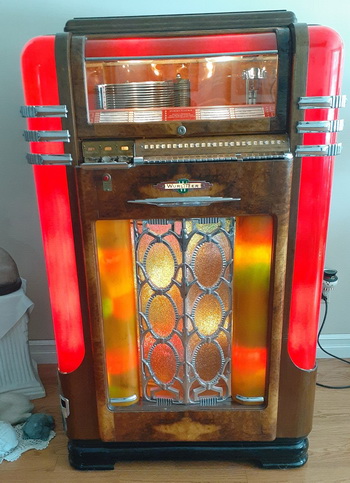
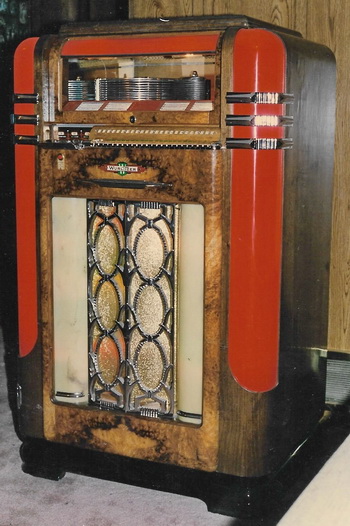
Restored and ready to accept your money. Five cents per
play. It is such a sight to watch this beautiful 86-year-old
jukebox in action! Well worth the three years of effort to
complete it.
|
|
- Before you purchase any vintage piece, do some research. What is the unit worth fully restored? What
kind of demand is there for it? How many were manufactured? There is so much information (of varying
worth) on the internet. It’s all at your fingertips.
- Examine the condition of what you’re buying. Know
what is "good" about it, and what is missing or needs
extensive work. Because I bought this jukebox sight
unseen, I was relying on the enthusiasm of a friend
who thought he found a great deal for me. I should
have asked more specific questions. Today, we are
able to have a seller take several pictures and send
them in an instant. It’s always best to inspect in person
though so you can make a more informed decision.
Sellers always minimize what it will cost to fix and/or
restore something.
- In terms of doing research, try to find out what parts
are available to complete the restoration properly. Will
parts from a similar machine fit, or are they unique to the
one you want to buy? Are there suppliers who can sell
you the parts (both used and reproduction) for a reasonable price? Factor in exchange rates and duty too.
- Before you begin any disassembly or work, take lots
and lots of pictures. These will help so much when it
comes time to put it back together, and also stand as a
testament to your restoration skills.
- Break down the required work into several categories:
Is there cabinet refinishing involved? Can you do it
yourself, or will you have to farm it out? If the latter,
who would you use? Can you restore the mechanism
yourself, or would you give it to a professional (for vintage phonographs I’d highly recommend any of the fellows who advertise in the APN if you’re planning on
restoring an old phonograph. You can also talk to fellow members. There is such a wealth of information in
CAPS!). Generally the less restoration you do yourself,
the more it will cost you for the overall project.
- If an original manual was once available, get a copy of
it. This will help immensely to explain adjustments,
parts, and mechanical functions (as well as help you
determine how much you can do yourself). Sometimes
you can find the manuals free, but pay for one if you
have to, as it will be invaluable and ultimately increase
the value should you later decide to sell.
- Don’t underestimate your own abilities. Try doing some
repairs yourself and you may have more success than
you thought. It’s also very gratifying.
- Before you buy, ask yourself what the collectible will be
worth should you later want to sell it. Many times we
end up putting more time and money into something
than what it is ultimately worth in the market. If you’re
planning on keeping and enjoying it yourself for years,
then it doesn’t really matter. However, if your goal is to
later flip it, the costs may make it prohibitive to purchase and restore.
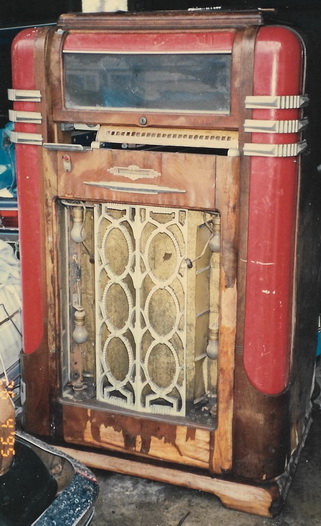
"Before" (1995) and "After" pictures.
There are about three years between these photos, but the
transformation is indeed dramatic.
|
|
Conclusion
The accompanying "before" and "after" photographs
were taken with my film camera in 1995 and scanned
to digital later for the presentation at our CAPS meeting. They document the initial dilapidated condition
and the slow progression of restoration, which took
about three years (except for the coin mechanism,
which took 17 years!).
Was it worth it? For sure! It proudly sits in our living
room, and certainly commands attention and admiration from most visitors. I’ve had almost 30 years of
pleasure from it, and am still mesmerized by the amazing sound and beauty that it provides as it faithfully
plays some great 78s.
Would I do it all over again? Hmm, I’d have to think
hard about answering that one! (but likely I would,
since I’ve learned so much by doing this one). I hope
you have enjoyed my description and documentation of
the restoration process for this vintage 1938 Wurlitzer
jukebox, and perhaps got a few pointers that may help
you, too.
|

